How To Put Z Flashing In Attic Liner

Roof System Components Roofing Terms Roofing Roof Repair

Pin On 2 Roof Wp Flashing

Plan Of Fireplace With Chimney Chimney Design Fireplace Design Fireplace
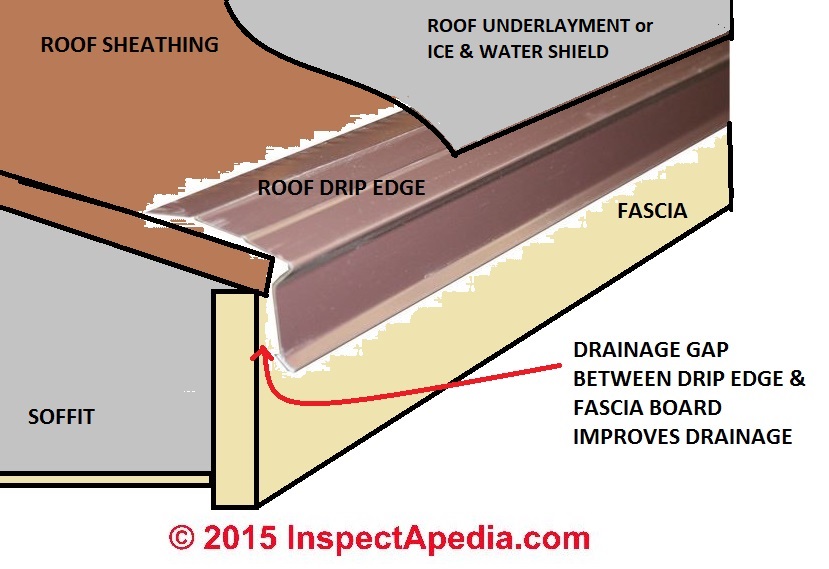
Roof Drip Edge Flashing Installation Faqs Q A On The Right Way To Install Drip Edge

How To Build A Raised Wood Floor Over Concrete Floor Roma In 2020 Flooring Concrete Floors Concrete

How To Fit A Chimney Flue Liner Liner Wholeness

Here is a guide on how to install lead flashing to your roof.
How to put z flashing in attic liner.

Wood Stove Basics Wood Stove Installation Stove Installation Portable Wood Stove

Pin On Rooftop

Pin On Dollhouse Roofing

Iko Cambridge Shingles Application Instructions Iko Roofing
Https Fabral Com Media 3797 Fab Pf Ssr Installationguide V4 Pdf

Roof Section

Pin On Home Building Repair Or Rebuild

How To Install Drip Edge And Step Flashing This Old House Youtube

How To Frame A New Interior Wall Door Frame Hunker Roof Trusses Roofing Pitched Roof
Http Www Floridabuilding Org Fbc Commission Fbc 0214 Commission Education Poc 635 635 0 Material Content Pdf
How To Install Roof Flashing On A Shingle Roof Iko Youtube

Pin On Woodworking Shop

Testing Drip Edge Installations On Roofing Ask This Old House Youtube

We Specialized In 3d Floor 3d Ceilings Stretch Ceiling Luxury Decor Joinery 3d Wall Panels 3d Wallpaper 3d Epoxy Floor Designs Floor Design Luxury Decor

Lookouts Framing Construction Timber Frame Construction Building A Shed

Extension Jambs For Replacement Windows Fine Homebuilding Window Trim Exterior Exterior Insulation Exterior Foam Insulation

Element B Shell Major Reference Works Wiley Online Library
Terms To Know Range Vent Hoods Zephyr Online
Https Encrypted Tbn0 Gstatic Com Images Q Tbn 3aand9gctbeo 6d4b5rqeyiwco7e24dizhoe7ryzfi3dp7dwzhos15wxb0 Usqp Cau
Https Www Burbankca Gov Home Showdocument Id 54123

5hnpi0c12 Es6m

Your History Teacher Never Told You This Mind Blown

Rmax R Seal 6000 Insulation Flashing 4 X 50
Keeping Rodents Out Of Your Pole Building Nomadic Research Labs
Source : pinterest.com
